Sunday, December 7, 2008

Crescent Elementary's Smartboards

A big shout out to Crescent Elementary Principal Debbie Shumard and teachers Casey Draper, Angie Drope, and Amanda Oettli for showing me how they are integrating their SmartBoards into their daily curriculum.

SmartBoards? What are they and why do they seem to be popping up everywhere? And more importantly, how are teachers integrating them into their curriculum?

Recently I met with Principal Debbie Shumard at Crescent Elementary to chat about the SmartBoards that have been installed into 15 classrooms at her school. We visited three classrooms to see teachers and students in action. It was really a lot of fun!

First, Mrs. Drope’s 3rd grade classroom. Her class was doing a synonym sort and match. Students were excited to go up to the board, find synonyms, and drag them to the bottom of the page. They discussed why they thought the words were synonyms. The students pretty much ignored the visitors because they wanted to see what was happening up at the board. Mrs. Drope said she really liked using the SmartBoard because her students were so excited about participating during lessons.


Next, Miss Draper’s 6th grade classroom. Her class was learning how to convert mixed numbers into improper fractions. Miss Draper had downloaded the lesson (which was matched to state standards) from the SMART Notebook lesson activities. The lesson included several interactive problems. We watched as a mixed number slowly morphed into an improper fraction.


Students were anxious to go to the board to work on problems. The entire class was fully engaged in the lesson whether they were up at the board or at their seat. Students said they like the interactivity, the size of the text, the colors, and the way the numbers moves around on the screen.

Last, Mrs. Oettli’s 3rd grade classroom. The students used the board to explain multiplication arrays, for example 2 x 3 or 4 x 6. They began by drawing an array on a 3x5 card (no pun intended). Then they created their array on the board with colored dots. All students anxiously watched as one person created their array on the board. They explained to me how to generate another colored dot by clicking on the ‘master’ dot. It was fun watching how excited the students were each time somebody went up to the board.


Some background: Principal Shumard initially introduced the idea of getting SmartBoards to the faculty last year. She asked the faculty to do a little online research about SmartBoard use. At a later faculty meeting she told her staff about classrooms she had visited where the boards were being effectively integrated into the curriculum.

She proposed the idea of purchasing the boards. Five teams indicated that they would all be interested in using them. Currently they have 3 in Kindergarten, 1 in 2nd grade, 4 in 3rd grade, 1 in 4th grade, 3 in 5th grade, and 3 in 6th grade.

The boards had been installed less than a month when I visited Crescent Elementary. I was impressed by how quickly and seamlessly the teachers have integrated SmartBoards and Notebook lessons into all aspects of their daily teaching. What a fun experience! Thanks again for a fun and enlightening experience.

How I embedded the slide shows into a blog post:
1-Download images into iPhoto.
2-Export selected images right from iPhoto into your Picasa account.
3-In Picasa, click on "Link to this Album" then click on "Embed Slideshow".
4-Picasa generates code.
5-Copy code.
6-Return to your blog post. Click 'HTML'.
7-Paste code in desired spot.
8-Preview post.
9-When satisfied with your work, Publish Post.

For a more complete explanation including screen shots, visit the Engaged Classroom blog at: http://jsdengaged.blogspot.com/

Tuesday, December 2, 2008

Mrs. McShinsky’s Class & The Clickers

On a recent visit to Alta View Elementary and Mrs. McShinsky’s 6th grade class, her students shared their thoughts with me about their new set of Senteo clickers. (class response systems)

(can you find 5 things that were not in the picture when it was taken?
If not, you may want to look at www.fotoflexer.com)


After a really fun demonstration of how they use the clickers during Math, I asked the students what they liked or disliked the most about the clickers.
Here is a sample of their replies:

What we like:

They’re a lot of fun
  • They simplify work.
  • Makes doing math and reading faster.
  • Clickers help save paper, go green.
  • Saves time, do not need to pass out papers.
  • Do not need write all of our answers down.
  • Students see their scores immediately.
  • The teacher can print off a report telling what kids got right, so it saved correcting time and gives us more time with our teacher.
  • Takes off the pressure. When the teacher looks at the results, she can see what we did wrong and figure out a way to help us.

(Do you know why this picture is so puzzling?
If not, you may want to look at www.picnik.com)

What we do not like:

We have to share them with other classes.

Mrs. McShinsky finds ready-made lessons and tests online that are aligned to the Utah core curriculum. She spends less time spent on creating lessons, writing quizzes, and grading paper, and more time on interacting with students.

And best of all,students want to improve their scores. They willingly ask for help on problems they missed so that they can score higher on a redo test. Kudos to Mrs. McShinsky and her class for diving right in there with the clickers and finding wonderful ways to use them.

Check out Mrs. McShinsky’s blog on the right hand side of this page. You will find more great ideas from her there.


A math joke for your class:
Five out of four people are bad with fractions.

Saturday, November 22, 2008

Mrs. Watson's 6th Grade Class Learns To Use Inspiration Software!

My shout out this week is to Mrs. Watson 6th grade class at Willow Springs Elementary. The students learned how to use Inspiration software to think, brainstorm, organize, and write about themselves. Let’s take a look: (created in ComicLife)

Teachers like Inspiration because we can see how the program uses Inspiration's ‘inspired standards match’ to support Science, Social Studies, Language Arts, Math and Fine Arts curriculum standards and objectives.

Students like Inspiration because they can see how fun it is to think, plan, organize, and write.


The class enjoyed the "Rapid Fire' tool, which allowed them to quickly create sub-categories. They also liked toggling between diagram and outline view because they could see their thoughts organized visually or in outline format.

I overheard one student say, “Hey this is how we can get our ideas organized”. That's what it's all about.

Mrs. Watson and her class did a fantastic job working through a couple of little glitches we encountered. We found that when changing the font, Inspiration unexpectedly quit on several laptops. My colleagues on the T4 team will look into that glitch to see what is causing it.

We also had a teensy bit of trouble logging onto the school folder.

We worked through these little problems, got everything resolved, and even had enough time to download the pictures I took into iPhoto and create a slide show.

Thanks to Mrs. Watson’s 6th grade class for a fun day letting me be part of your class. I enjoyed working with you and showing you how easy-to-use and really fun Inspiration can be.


For more information about how you can integrate Inspiration into your curriculum, check out their sample lesson plans, videos, and the Inspiration "Learning Community", a page with really great lesson ideas created by other educators!

Congratulations to Willow Springs Principal, Sharyle Karren who was recently recognized as Literacy Principal of the Year at the 43rd Utah Council of International Reading Association Convention for her passion and commitment to literacy.

A shout out to Peggy Robison's class at Edgemont Elementary for learning how to use Inspiration software. A few days after our lesson using the laptops, Mrs. Robison's students used Inspiration in the lab for their NOVA (formerly DARE) essay. Awesome job!

A joke for your class:
Why did the whale cross the road?
To get to the other tide!

Tuesday, November 4, 2008

ComicLife

ComicLife is one of my favorite programs. It is so easy to learn and fun to use. Why ComicLife in the Classroom? Great article from MacInstruct.com. What can you do with it? Let's look at a comic of my recent trip:

The ComicLife Gallery at Plasq.com has some of cute ideas. Recently I bought a fantastic book called ComicLife for Educators, which is jammed packed with ideas on how to use ComicLife in the curriculum. Here are a few ideas.


If you would like me to come out and work with your class on a ComicLife (or any other application) project, please let me know.

Remember: Assignment sheets and timecards are due by Nov 30th--since that is a Sunday, you may turn them in to me before Thanksgiving or on Monday, December 1st. If you need to speak with me about anything --help, problems with equipment, or if you are just frustrated and feeling like this guy---->

I am available at 567-8726. Call me and let's chat. I am here to help you have a successful year incorporating your new technology tools into your curriculum.

Our Engaged Classroom blog is located at:
http://jsdengaged.blogspot.com

Congrats to Casey Draper, Bonnie Dixon, and Sandy Lloyd at Crescent Elementary for their wonderful discussion of the book, Using Technology with Classroom Instruction That Works. This can be found here. Hey, when you have one of the authors of the book congratulating you on such a fine job, you know you are doing great.

Congrats to Trish Morrison for being one of The Board of Education’s Five-Star Award winners. We are so proud of you!

A joke for your class:
Why do seagulls live near the sea?
Because if they lived near the bay, they would be called bagels.

Wednesday, October 1, 2008

Jing Project

In my job I often explain complex directions to teachers on the phone. Occasionally it takes quite a long time to explain something. I often wish I could easily make a quick video and just send it to the teacher so they could actually see "how to". I have not been able to do that easily before---but then came JingProject.com.So what is Jing, and how does it work? It is a program that instantly captures and shares images and video…from your computer to anywhere. How does it work?

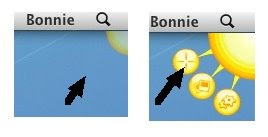
1- Download and install the program.2-The program icon, a sun, sits in the upper right corner of my Mac. When I mouse over it, the program shows 3 yellow circles, each with an option: Capture, History, More.


3-Click on the top yellow circle with the plus sign (+). You will be prompted to indicate which part of the screen you wish to capture.

4- The control bar will appear. Choose image or video option, click your option and begin.
5- You will see a 3-2-1 countdown to give you time to clear your throat or take a drink of water.


6-Record your video.

7-Click Share. Jing conveniently places a URL to your content which you can paste into any of your conversations, emails, documents, blogs, etc.

That's Jing. I hope that you like it and might use it.

Wednesday, April 16, 2008

Classroom 2.0

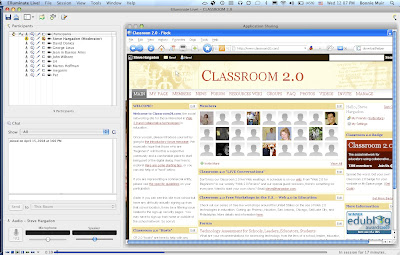
For the last few months I have been looking at Classroom 2.0. It looked too unwieldly, so I waited until I could have somebody take me on a tour, and what a tour it was! All I had to do was sit back and watch. It was awesome!! You, too, can take that same tour.

Here is how:

Note: PC users, you do need to download Elluminate. Mac users (10.1 and higher), the necessary software, Java Web Start, comes pre-installed on your machine, so proceed to step 1.

Step 1: Go to http://www.classroom20wiki.com
Step 2: Click on Live Conversations
Step 3: Locate Classroom 2.0 tour . Click on Video.
Step 4: This will take you to Elluminate. Slick on "Start Elluminate Live!"
Step 5: Elluminate opens the tour. Sit back, listen, rewind when you want to, and enjoy!


Steve Hargadon takes us on a tour of the site. People who attended that session are visible on
the left hand column. Ocassionall you will see them type questions which Steve will answer.

Steve encouraged people to be brave and post questions, start their own page, or just wander around to see how they could use Classroom 2.0. Although I do like Classroom 2.0, I was a bit impressed with Elluminate as a way to reach a large audience.

There are lots of recorded sessions on the Classroom 2.0 wiki. One of my favorite ones is a family from Santa Cruz who is taking their little girl on a multi-year travel adventure trip around the world. Steve chatted with them in Elluminate about this educational adventure.

I hope you take a look at the list of educational conversations on the Classroom 2.0 wiki. This is one of the more exciting things I have seen online in a long time!

Friday, February 29, 2008

My Mac On Windows: VMWare Fusion

I have been looking for a great virtualization software to run Windows in Mac OS X.

I want to run ArcView 9.2 on my Mac. I had heard a lot about Parallels, so I tried it. It worked fairly good, but it crashed once too often.

I decided to give VMWare Fusion a try at the recommendation of a technology director in another school district. I am so glad I did. It is easy to work with and has not crashed at all. In fact, it is much easier for me to work with. I really like it.

So if you are having issues with Parallels or if you are just looking for a good virtualization software to run Windows in Mac OS X, I would suggest looking at the Apple web site to see what they say about VMWare Fusion.

Our district purchases it from Valcom at about $32 a copy.

It is easy to install, to run, and gets along with my Mac like The Dog, The Cat, and The Rat. (You gotta love YouTube for this gem).

Sunday, February 17, 2008

Keyboard Illumination Problem Solved

I was getting so irritated at my MacBookPro keyboard because in low light conditions, I could barely see the keyboard. I had the illumination turned on in the Keyboard Preference, but it hardly worked at all. My keyboard was barely lit up. Grrr.....

A little research led me to a great program, Lab Tick. I quite like the way I can set the keyboard preferences to illuminate in low light conditions--and have it stay that way.

Let's take a peek at the preferences Lab Tick allows us to set:
I created three shortcuts which allow me to dim, brighten and toggle Lab Tick on and off. If you are having issues with your keyboard illumination, you may wish to look into this program. It is the only thing that has worked for me on a consistent basis.

Thanks Lab Tick. What a great little program!

Wednesday, February 13, 2008

Attending a class~~at home! I love it.

Tonight I am in class--at home--with 35 other people from around the world. Australia, Argentina, Chicago, California, Pennsylvania, and many other places.The class is an open professional development class taught by Darren Draper & Kelly Dumont (in Utah) and Robin Ellis (In Pennsylvania). We are using a wikispace page as our central location. The instructors used a tool called UStream for the video and they embedded a chat stream using Meebo so we could communicate.

Later we broke into groups of 6 people and collaborated via Skype and Google docs to create a presentation using the Google presentation tool. I have no idea where my fellow collaborators were physically, nor did it matter. We just created the presentation together. I later found out one of them was in Australia. I kind of thought she typed with an Australian accent. : )


You know how there is always one person in a group who makes things a bit difficult for everybody? Well, we had an uninvited guest who entered our chat room. This became rather irritating, giving us all concern about using an open chat room when teaching with Ustream. So we will need to find a way to block those who want to just create problems.

But even with the troll (real term, not my opinion) it was fascinating collaborating with people from around the world.

Monday, February 11, 2008

Fenway Park and Coors Field

Lately I have been using an educational version of ArcView, called ArcExplorer, for my GIS projects. While the full-blown professional GIS program, ArcView is a fantastic program, it does take time to learn. Arc Explorer, on the other hand, is so clean and simple, with practically no learning curve. The students seems to pick up on ArcExplorer very quickly.

A great way to begin teaching ArcExplorer is with the baseball activity. Who can resist the Boston Red Sox or the Colorado Rockies?

We discuss a few vocabulary words, then dive into the maps and tools. We learn to open files, resize, zoom in, zoom out, pan, and measure sections the map.


Our first activity involves simple measurement. We measure around the bases. We determine the shortest and farthest distances a batter would have to hit the ball in each stadium to make a home run.

Then we use reasoning skills to determine what time of day the satellite image was take based on shadows. Next choose where we would like to sit in each stadium to be out of the sun. We estimate the number of parking spaces in various parking lots. Lastly, we turn layers on and off to see the effects on the map.We finish up with a few fun facts about each field. Did you know for example that Fenway Park was built in the Fens area of Boston? That it opened around the time of the Titanic disaster? Did you know that a ball hit in Coors Field travels an average of 9' farther than at sea level? The air is thinner at Coors Field (located in the Mile High City of Denver), reducing the resistance on the ball, alowing it to travel farther.

Saturday, January 19, 2008

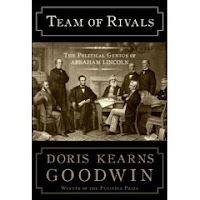
Team of Rivals by Doris Kearns Goodwin - Quite a read!!

This book is about Abraham Lincoln as a leader, a manager and a politician.

Once elected to the presidency, one of the first things Abraham Lincoln did was to select his cabinet. He selected the very three men that he beat out for the 1860 Republican presidential nomination to hold three important positions in his administration:
  1. William H. Seward, a former governor and senator of New York, became Secretary of State.
  2. Salmon P. Chase, a former governor and senator from Ohio, became Treasury Secretary.
  3. Edward Bates, an elder statesman and former Missouri congressman, became Attorney General.
Lincoln selected a fourth political competitor, Edwin M. Stanton, as his Secretary of War.
Lincoln's reasoning was that with the slave crisis threatening the country, he needed the strongest men surrounding him.

"Every member of his administration was better known, better educated, and had more experience in public life than Lincoln. Their presence in the cabinet might have threatened to eclipse the obscure prairie lawyer from Springfield. It soon became clear, however, that Abraham Lincoln, would emerge the undisputed captain of this most unusual cabinet, truly a team of rivals." (Doris Kearns Goodwin)

I find it amazing that Lincoln was able to choose some of his fiercest rivals to work so closely with him during his presidency. But more amazing still is that these very men became some of his closest friends and strongest supporters. When Lincoln was assassinated, John Hay, Lincoln's personal secretary, reported that their grief was uncontrollable.

What an amazing book this is. Not only did I find the book historically interesting and informative, I think it is has some good lessons for people that work together as a team.

Monday, January 14, 2008

Communicating with Skype and CamTwist

This morning my teammates and I spent some quality time using 4 programs: CamTwist, Skype, UStream TV, and YugmaSkype. Today I will show what CamTwist and Skype can do. Later this week, I will discuss UStreamTV and YugmaSkype.

CamTwist is a software package that lets you add special effects to your video chats. It's also possible to stream your desktop and still images. I like the picture in picture (PIP) as well. With CamTwist, you can also use multiple video chat programs at the same time. Some fun effects we tried are: halo, thought bubble, comic book, and N-Square. In this image my colleague PJ is shown using the effect N-Square full screen while I am in PIP with a thought bubble in the bottom left corner.

Skype allows you to make calls from your computer — free to other people on Skype and cheap to landlines and cell phones around the world.

When using CamTwist and Skype together,
Open CamTwist first then follow these steps:
In Step 1, click on "Desktop" as your video source, click "Selec
t" at the bottom of the video source list. Next in Step 1, click on "Webcam" as another video source, and then click "PIP" (which stands for picture in picture) at the bottom of the video source list.

In Step 2, have some fun by adding an effect or two. To see a preview of how CamTwist will look. Go up to the menu and choose "Preview". Check out these cool effects: Cube, Fire, Halo, and Snow.Step 3 allows you to adjust your settings. Lastly, in the last box, settings, adjusting the scale slider allows the viewer to see either more of you or more of your desktop. Nudging the PIP black box will position where the PIP will be located on your screen.
Let's take a look at what the viewer sees. My colleague is seeing my desktop with a small streaming video of me in the upper right hand corner. This is a very cool way to chat and show your screen simultaneously.


Check back soon to see how we used these two programs along with UStreamTV and YugmaSkype.

Thanks to Darren Draper for teaching me these programs!